As the name of my blog indicates, I spend a lot of time thinking about home. Of course, my Heavenly Home is the one that is eternal, so that’s where I need to lay up my treasures, and that’s the one I’m striving for. But in the meantime, I have been given this tiny piece of the here-and-now—this home on the edge of town, this family, this neighborhood—in which to serve Him. And, though this is in the earthly realm, I want the things that happen here to be investments in the Heavenly realm.


Showing posts with label kitchen remodel. Show all posts

Friday, January 24, 2020

Pineapple House Kitchen | Completed Goals


It was a little over three years ago when I first told you about our plans for a s-l-o-w remodel of the kitchen here at Pineapple House. 


Little by little, step by step, we made changes. Let me give you a review of what has happened in the kitchen since we moved here:

BEFORE

✔ We replaced the refrigerator and dishwasher with new stainless steel models.

✔  We replaced the cook top with the double oven range we had bought for The Farmhouse a few months before we moved, and removed a lower cabinet in the process.

✔  We removed the wallpaper and painted the walls antique white. 

✔ We painted the trim. (Actually ~ahem~ we've painted it three times. Ack! Long paint story here.) 

✔  We hung a new chandelier over the island. 

✔  We constructed, hung, and painted interior shutters

✔  We removed the wall oven and created an alcove for the microwave.

✔  We took down the little shelves around the window and replaced the curvy molding with a simple frame. 

✔  We painted all of the kitchen cabinets with Kangaroo by Benjamin Moore. 

✔  We put beadboard paneling behind the countertop and stove, and around the window.


✔  We installed walnut butcher block countertop and backsplash.

✔  We installed a new enameled cast iron sink and a bridge faucet


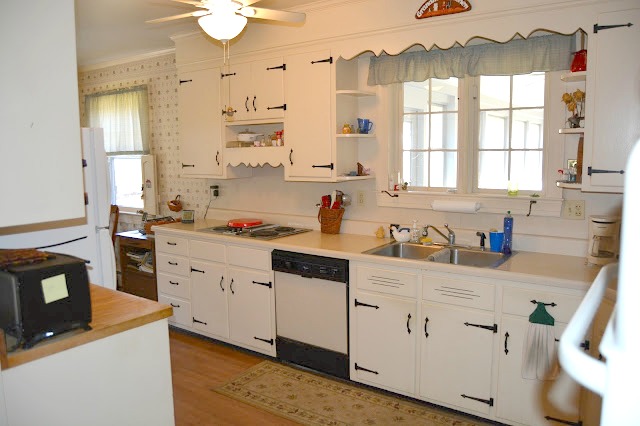
In October 2018, the kitchen looked like this:


But we still needed to give attention to the south wall. We had plans to move the washing machine to the basement, move the fridge into that space, re-configure the cabinets, and install a longer section of countertop.


This past fall, we finally got to the south wall of the kitchen, the one that was going to be the most complicated project. 


Here is the "before," with a short counter, the refrigerator in the middle of the wall, and the washing machine on the right . . . 


When Ron was off in September, the work began. He did all of the prep work required to move the washing machine from the kitchen down to the basement: ran electric, adapted the plumbing, installed a pump and a laundry sink.


In October, it was full steam ahead! 

~ The first step was moving that washing machine. (Yikes!) 

Ron strapped it to a hand truck and he was doing all of the pushing. My job was to help him tilt it back, and to navigate it through the doorways and around corners. Of course, there was the momentary panic when he started wheeling it down the basement stairs WITH ME IN FRONT OF IT, at which time I left my post of duty and said, "If it's going to fall, I'm not going to be able to stop it so I am getting out of the way!

The washing machine did not fall (hallelujah!), and we were washing a load of clothes that afternoon . . . not in the kitchen!

Do I miss the convenience of a washing machine in the kitchen? Yes! But do I miss the washing machine in the kitchen? Not. at. all. (And there is talk of converting our very tiny half bathroom into a tiny laundry area. We think there's just enough room for a small stackable washer/dryer.) 

~The rest of vacation week was spent re-configuring everything else! 


We measured and measured and adjusted our plans. After a lengthy discussion and a lot of measuring, we decided to create a wider space around the refrigerator. We did not want to be limited to the size fridge that we have now. 

Eventually, we'd like to have a counter depth refrigerator. It would free up a lot of space in our galley kitchen! Unfortunately, counter depth was not on our radar four years ago when we were selecting our appliances. But someday we would like one, so we left enough space to accommodate it. And of course, changing the opening around the fridge meant altering the spaces for cabinets too. 


After we adjusted our cabinet sizes, we decided to leave a display space above the refrigerator rather than enclosing it with doors.


When Ron went back to work after his vacation, there was still more work to do, but the lion's share was done. We knew we'd be finished well before our Thanksgiving deadline! 


And now . . . THIS is what we have: 


We are so pleased with this part of the remodel! It has made a huge difference in the function of the kitchen!

First of all, we love this new longer section of countertop, which is far more useful than two shorter ones would have been. It is a great baking center, but it also comes in handy for a drink station when we have family dinners and parties. 


It is also wonderful to have all of my pots and pans back together again . . . and not stuffed into nooks and crannies (in the kitchen closet, in different cabinets, in the basement!) all over the house.


Last, but definitely not least, we feel as if we have gained space with this last stage of the remodel. That is a good thing!

Before, the refrigerator and the stove (both of which jut out beyond the cabinets) were directly across from one another. That made a narrower walkway in that space, not to mention that if either door was open, it compounded the problem. When the fridge was moved over to its new space, it immediately opened up the main work space to feel twice as big! (It isn't, but it feels like it is!)


Now we have completed all of our original goals for the kitchen! 

So are we done? Well, we will probably replace the floor some day. And then there's always the possibility of a fourth paint color . . .  

(You knew that, didn't you?)

But we feel that our kitchen has been updated, it reflects our personal style, and it functions well with how we live and work in it. 

It was worth the wait! 

Wednesday, November 6, 2019

{30 Days of Thankfulness} Day 6


I am thankful for my kitchen!

About a month ago, I have you a progress update. Ron was off that week and we (mostly he) were working hard on the kitchen checklist. Our goal was completion by Thanksgiving. But guess what?

We finished last week! 

I plan to do a separate blog post sometime soon (need to get some good photos). But in the meantime, here's a sneak peek. 

Yes, I am thankful for my kitchen . . . and for my handyman!


Saturday, October 6, 2018

More Changes in the Kitchen!


Two years ago, I told you about our plans to s-l-o-w-l-y make changes to our kitchen. Although the Pineapple House kitchen had a charming vintage vibe, our own style is a little more simple. We came up with a list of changes we wanted to make to the room, over time, to make it fit both our decorating style and how we wanted the room to work. 

BEFORE: charming kitchen with a vintage vibe
BEFORE: shortly after we moved in


"Slow" was the right word, but progress has been made! Here are some of the things we have checked off of our (kitchen) list since we have moved to Pineapple House

✔ We replaced the refrigerator and dishwasher with new stainless steel models.

✔  We replaced the cook top with the double oven range we had bought for The Farmhouse a few months before we moved, and removed a lower cabinet in the process.

✔  We removed the wallpaper and painted the walls antique white. 

✔ We painted the trim. (Actually ~ahem~ we've painted it three times. Ack! The current color is Benjamin Moore's Kangaroo. Long paint story here.) 

✔  We hung a new chandelier over the island. 

✔  We constructed, hung, and painted interior shutters. 

✔  We removed the wall oven and created an alcove for the microwave.


All of these changes had been completed the last time I shared an update


And then . . . 

✔  We took down the little shelves around the window and replaced the curvy molding with a simple frame. (I know that so many people loved those vintage shelves and the molding, but they just did not fit our decorating style. If you loved them, please forgive us!)

✔  In May, we painted all of the kitchen cabinets with Kangaroo by Benjamin Moore. 


And when Ron was on vacation in September . . . 

✔  Demo! (Removed the old countertop and sink.)

✔  We put beadboard paneling behind the countertop and stove, and around the window.


✔  We installed walnut butcher block countertop and backsplash.

✔  We installed a new enameled cast iron sink and a bridge faucet. 


We decided to go with butcher block countertop again, as we had at The Farmhouse. We love the way wood adds warmth to a kitchen. This time we chose walnut from Lumber Liquidators. It is actually darker than I had imagined, but I like it, and I think I will like it even more as time passes and the wood develops patina.


I have not finished styling the kitchen. With so much neutral, I am trying to add in some color without going over the top. I have asked Ron to make a cover for the toaster oven (not currently on the counter), disguised as an old apothecary cabinet. I'll paint and distress it. That will add some subtle color. I am also pondering where I could add some fabric, for color and softness. I hadn't planned on having curtains/valances, but that is a possibility.


As much as we loved our big farmhouse sink in The Farmhouse kitchen, we decided to use a drop-in sink this time. We are all tall-ish people, and the deep farmhouse sink was just too hard on our backs! I did want a single bowl again, because that allows plenty of space to wash (or soak) something big like a cookie sheet or a frying pan with a handle. We found this sink online at Signature Hardware.


We wanted a high arc faucet and we wanted separate handles. Ron preferred a bridge design. I had been shopping for a polished nickel faucet, but then Ron found this one in black with white cross handles and my search was over!


There are only a few projects left on the original list . . . and they all involve this south wall of the kitchen shown below.


  • Move the washing machine down to the basement.
  • Move the refrigerator over to the space where the washing machine sits now. This will involve some re-configuring of the upper cabinets. But it will allow us space for a longer section of countertop instead of two short sections on either side of the fridge.
  • Build a drawer and cabinet unit to fill in the empty space.

Granted, none of the remaining items on our list is simple!

But we'll keep plugging away at it in our slow and DIY sort of way, and in the end, we'll (kind of) have a new kitchen!

I already feel more at home in the Pineapple House kitchen. It feels like my space now. And I am happy to use it to serve my family, my friends, and anyone else who the Lord puts in my path!


Friday, October 28, 2016

Plans for the Kitchen


Pineapple House has been our home for six months now! Oh, how time flies...

We feel like we have come a long way. The living room and dining room are painted and styled. The girls' bedrooms are done. (You can see Kati's room ~here~ and I'll share Bekah's room soon!) We have planted an herb garden and done some outside painting and sprucing up. And now we are turning our attentions to the kitchen. 


You know that we are DIY-ers when it comes to house projects, and the kitchen is no exception.

We plan to do our updates in stages...a little bit at a time. 

Have I told you that Thanksgiving is my favorite day of the year? My friend Joanne told me of her friend who designed and built her entire house for Thanksgiving Day! I have never met Joanne's friend, but I know that I like her! Fortunately, Pineapple House is already well-suited for Thanksgiving Day. (We had a trial run a few Sundays ago when we had 25 people for dinner!) 

But back to the kitchen...

In preparation for Thanksgiving, Ron began Kitchen Updates: Phase I earlier this month with the installation of our double-oven range. I haven't cooked a turkey yet, but I have certainly been enjoying the (almost) new range!


This week, we began Phase II: removing wallpaper. 

About that wallpaper. Years ago (early 1980's), Ron and I were in a local paint store. While he was shopping for something-that-I-don't-remember, I sat and browsed through wallpaper books. I came across a pattern that I loved, kind of a sampler look with houses and baskets and pineapples and hearts and a coordinating border, but it was definitely not in the budget. Our farmhouse kitchen was large and would have required a lot of wallpaper. 

When we came to see Pineapple House for the first time, I was amazed to see that wallpaper in the kitchen!


However, since it is 2016 and not 1985, the wallpaper is coming down. In fact, a good deal of it came down a couple of evenings this week. (Of course, we are hosting a ladies' game night this weekend. Nothing like a bit of remodeling chaos to make your guests feel at home, huh?) 

After the wallpaper is down, we are going to paint that space and also the space on the other end of the kitchen past the cabinets. The walls will be the same antique white that we have used in all of the other rooms. The trim will be...ahem. I'll get back to you on that. (But we're narrowing down our choices.)   

We are going to replace the shutters with paneled shutters which Ron will make. The valances are new; they will stay. 


Where the previous owners had a kitchen table, we have chosen to put our kitchen island. We considered a small table for an eat-in kitchen, but we are sentimental about the island and there was really nowhere else to put it. We purchased a couple of bar stools so that someone could eat breakfast or lunch, or just hang out with the cook.

Or hang out with a cousin. :)


Other phases, yet to come: 

1) Move the washing machine down to the basement. (Part of me will miss having it so handy. The other part of me will be happy to reclaim some kitchen space.) 


2) Replace the stained glass chandelier with one that fits our style.

3) Move the refrigerator over a bit, to where the washing machine is now. This will allow us to have a longer counter surface, instead of two short lengths on either side of the fridge. 


4) Build a new bottom cabinet to fill in the space when the fridge is moved. (This will make me happy, because I lost the cabinet that was under the cook top. Now my pots and pans are all over the place, including some down in the basement. How's that for convenience?) 

5) Install a new sink. Although we loved our large undermount farmhouse sink at The Farmhouse, we're not sure that would be right for this kitchen. We're considering a smaller farmhouse sink from Ikea, but I prefer a single bowl sink. Fortunately, that decision is a bit down the road. 

6) Replacing the countertop. We will probably go with butcher block again, as we loved our counters in The Farmhouse. Wood is so warm and pretty. 

7) Painting the cabinets. We'll probably keep the hardware. It's not "modern," but it fits with our style. 


Again, this will all be done over a period of time. Don't expect a big reveal in the next couple of weeks! But I do promise to keep you posted as we complete each phase. 

We are excited about making the changes that will make it our kitchen! 


Monday, September 17, 2012

An Island Experiment

Ron has promised to make an island for the newly remodeled kitchen.  Actually, we have been planning an island for years (and years), but the recent renovations have brought the plans back into the forefront, so after he finishes Kristin's second bookshelf, the island is the next thing on the list.  (I hope.  Hint, hint to Ron if he's reading.)


We definitely want a freestanding island.  We like the flexibility of adding a work/serving surface while also being able to move it about if necessary for a gathering or project.  So when I saw Melissa's post about freestanding kitchen islands, my wheels started spinning.  

The "freestanding" part is definite...but little else is.  Shelves or not?  An open feel, or solid with doors and drawers for coveted storage?  A place for cookbooks?  Butcher block or old wood?  Painted or stained?  

So today I experimented.  

How does one "experiment" with an island, you ask?

I robbed this table (made with old wood) from my living room... 


...and brought it into the kitchen.  Just to see if the "open" feel is what I want.  (I suspect that it is.  I don't want to hide my new farmhouse sink with a closed-in type of doors-and-drawers island.)


I can't leave it here.  Ron and I would miss it there in the living room between our chairs.  Where would we set our cups of evening coffee?!  Plus, an actual island would need to be a bit higher to be used as a work surface for Kati and me.  We're too tall for this one.  

But what do you think?  Does it look at home here?  

Saturday, August 25, 2012

Leftovers

I'm not talking about dinner leftovers, although I love those.  I'd much rather have some reheated soup or some salad for lunch than a sandwich.  

But the leftovers I'm talking about today are leftovers from our kitchen remodel.  

The scariest part of the kitchen remodel for me was the day that Ron put in our countertop...and asked ME to help him measure!  ACK!!  Too much pressure!  I was so afraid that we would make a mistake, and how do you fix a mistake that you discover after you have cut this costly piece of wood that can only be purchased at a store that is a couple of hours drive from your house?  And then the two 45° pieces did. not. meet.  (We later realized--after some blood, sweat, and tears--that it was the wall that was not square, not our countertop measurements/cuts.)  And then there was the opening for the sink...

~shudder~  

Why am I reliving this?  The good news is that the measuring is done.  The kitchen remodel is done.  And now we have leftovers.  

Leftover countertop, to be exact.  Made into a new cutting board.

These kinds of leftovers are great!  


I'm putting the cutting board to good use...


And there were enough "leftovers" to make another for Kristin's birthday.


And Ron thinks that he will have just enough to make one for Kati (who drooled over mine).  
Related Posts Plugin for WordPress, Blogger...